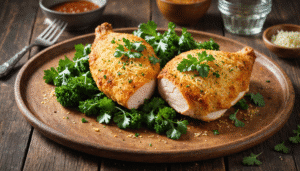
Are you searching for a dinner solution that is both incredibly delicious and deceptively simple to prepare? Look no further than this mouthwatering garlic parmesan baked chicken. It’s the perfect answer to the eternal “what’s for dinner?” question, especially on those hectic evenings when time is of the essence. Discover our juicy Garlic Parmesan Baked Chicken recipe. It’s a simple, family-friendly meal with a crispy, cheesy crust, ready in under 30 minutes for a delicious dinner. This recipe transforms basic chicken breasts into a gourmet-feeling experience with minimal effort, using pantry staples to create a flavorful, golden-brown crust that will have everyone asking for seconds. It’s a guaranteed crowd-pleaser that proves weeknight meals don’t have to be boring.
Why You’ll Love This Garlic Parmesan Chicken
This recipe is designed with your busy life in mind. It checks all the boxes for a perfect weeknight meal, combining speed, simplicity, and outstanding flavor. You don’t need any special culinary skills or hard-to-find ingredients to achieve a restaurant-quality result right in your own kitchen.
First and foremost, the hands-on prep time is incredibly short. In about 10 minutes, you can have your chicken coated and ready for the oven. This means less time spent over the stove and more time for yourself or your family. The oven does most of the work, baking the chicken to juicy perfection while you prepare a simple side dish or simply relax.
Furthermore, this dish is a fantastic foundation for countless family dinner ideas. The classic combination of garlic and Parmesan is a universal favorite, appealing to both kids and adults alike. It’s a reliable way to get a wholesome, protein-packed meal on the table that everyone will enjoy without any complaints.
Ingredients You Will Need
One of the best aspects of this easy baked chicken is the simplicity of the ingredient list. You likely have most of these items in your kitchen already. Here’s what you’ll need to create this flavorful masterpiece:
- Chicken: 4 boneless, skinless chicken breasts (about 1.5 to 2 pounds). For more even cooking, you can pound them to an even thickness of about ½ to ¾ inch.
- Olive Oil: 2 tablespoons to help the coating adhere and promote browning.
- For the Crispy Coating:
- 1 cup grated Parmesan cheese (the kind from a block, not the canned powder, for best flavor and texture)
- ½ cup Panko breadcrumbs (these create a lighter, crispier crust than traditional breadcrumbs)
- 1 teaspoon garlic powder
- 1 teaspoon dried parsley
- ½ teaspoon paprika (for color and a hint of sweetness)
- ½ teaspoon salt
- ¼ teaspoon black pepper
Step-by-Step Baking Instructions
Follow these simple steps for a perfectly cooked garlic parmesan baked chicken every single time. The process is straightforward and nearly foolproof.
- Preheat and Prepare: Begin by preheating your oven to 400°F (200°C). Line a baking sheet with parchment paper or lightly grease it with cooking spray. This prevents sticking and makes cleanup a breeze.
- Prepare the Coating: In a shallow dish, such as a pie plate or wide bowl, combine the grated Parmesan cheese, Panko breadcrumbs, garlic powder, dried parsley, paprika, salt, and pepper. Mix them well with a fork until fully incorporated.
- Coat the Chicken: Pat the chicken breasts dry with a paper towel; this is a crucial step for helping the coating stick. Brush each chicken breast lightly with olive oil on both sides. Then, press each piece firmly into the Parmesan mixture, turning to coat all sides evenly. Place the coated chicken on the prepared baking sheet.
- Bake to Perfection: Bake for 18-22 minutes, or until the chicken is cooked through and the internal temperature reaches 165°F (74°C) when measured with a meat thermometer. The exterior should be golden brown and crispy.
- Rest and Serve: Remove the chicken from the oven and let it rest for 5 minutes before serving. This allows the juices to redistribute throughout the meat, ensuring every bite is moist and flavorful.
Tips for the Crispiest Coating
Achieving that ideal, crispy, non-soggy crust is easier than you think. A few simple tricks can make all the difference in your final result.
Use Panko Breadcrumbs
Panko breadcrumbs are Japanese-style breadcrumbs that are lighter, flakier, and crispier than traditional fine breadcrumbs. They don’t absorb as much oil, which helps them stay crisp during baking. If you only have regular breadcrumbs, the recipe will still work, but the texture will be denser.
Don’t Skip the Oil
Brushing the chicken with oil before applying the dry coating is essential. The oil acts as the “glue” that helps the Parmesan and breadcrumb mixture adhere to the chicken. It also helps conduct heat, encouraging the Maillard reaction that creates a beautiful brown color and deep flavor.
Avoid Overcrowding the Pan
Make sure there is some space between each piece of chicken on the baking sheet. If the pieces are too close together, they will steam instead of bake, resulting in a softer, less crispy coating. Using a wire rack placed on top of the baking sheet can elevate the chicken, allowing hot air to circulate all around it for maximum crispiness.
What to Serve With Your Chicken
This versatile garlic parmesan recipe pairs wonderfully with a wide variety of sides. Here are some classic and healthy options to create a well-rounded meal.
- Pasta: Toss some fettuccine or spaghetti with a light Alfredo sauce, olive oil, or a simple marinara. The chicken can even be sliced and served on top of the pasta.
- Vegetables: Roasted asparagus, broccoli, green beans, or zucchini are excellent choices. You can toss them in oil and seasonings and roast them on the same baking sheet as the chicken during the last 15 minutes of cooking.
- Potatoes: Creamy mashed potatoes, crispy roasted potatoes, or a light potato salad all complement the flavors of the chicken beautifully.
- Salad: A fresh, crisp garden salad with a tangy vinaigrette provides a refreshing contrast to the rich, savory chicken.
| Side Dish | Prep Style |
|---|---|
| Broccoli | Roasted with Olive Oil |
| Potatoes | Garlic Mashed |
| Pasta | Lemon Butter Sauce |
| Green Beans | Sautéed with Almonds |
How to Store and Reheat Leftovers
If you’re lucky enough to have leftovers, they store and reheat wonderfully. Proper storage is key to maintaining quality and food safety.
Storage: Allow the chicken to cool completely to room temperature within two hours of cooking. Then, store it in an airtight container in the refrigerator. It will keep for up to 3-4 days. For longer storage, you can freeze the baked chicken. Wrap each piece individually in plastic wrap and then place them in a freezer-safe bag or container. It can be frozen for up to 3 months. Thaw in the refrigerator overnight before reheating.
Reheating: To restore the crispy coating, avoid the microwave. Instead, reheat the chicken in a preheated 350°F (175°C) oven or toaster oven for about 10-15 minutes, or until heated through. You can also use an air fryer for 3-5 minutes at 370°F (190°C), which does an excellent job of crisping the exterior while warming the inside.
Frequently Asked Questions
Can I use chicken thighs instead of breasts?
Absolutely! Boneless, skinless chicken thighs work great in this recipe. Because thighs are often smaller and have a different fat content, the cooking time may need to be adjusted slightly. Always use a meat thermometer to ensure they reach an internal temperature of 165°F (74°C).
My coating isn’t sticking to the chicken. What did I do wrong?
The most common reason for the coating not sticking is moisture on the surface of the chicken. Always pat the chicken breasts thoroughly dry with paper towels before brushing them with oil. Also, press the coating firmly onto the chicken to help it adhere.
Can I make this recipe gluten-free?
Yes, it’s very easy to make this a gluten-free garlic parmesan baked chicken. Simply replace the Panko breadcrumbs with an equal amount of gluten-free breadcrumbs or crushed gluten-free crackers. Always double-check that your Parmesan cheese is certified gluten-free, as some pre-shredded cheeses may contain anti-caking agents with gluten.
Is it necessary to pound the chicken breasts?
While not strictly necessary, pounding the chicken to an even thickness is highly recommended. It ensures that the chicken cooks evenly throughout. Without pounding, the thinner end of the breast can dry out before the thicker center is fully cooked.
This Easy Garlic Parmesan Baked Chicken recipe is more than just a meal; it’s a reliable solution for busy lives. It delivers on its promise of being quick, simple, and packed with flavor that the whole family will love. The combination of a crispy, cheesy exterior with tender, juicy chicken inside is simply unbeatable for a weeknight dinner. With minimal ingredients and maximum results, this dish is sure to become a regular in your meal rotation. So next time you’re short on time but craving something delicious, remember this recipe—it’s the perfect way to turn an ordinary evening into a special, satisfying dinner without any stress.


